Honestly, growing up out in the country, there weren't many activities we did at Christmas, but one thing I do remember is the divinity Mama made every year. If the weather was just right, it came out light and fluffy... but if the weather wasn't just perfect, it would be sticky and gooey, but it still tasted delicious! It took a long time to mix it up, and it has to be folded just right... I do want to attempt it this year, even though I haven't made it in over 20 years.
Monday, December 2, 2013
Sunday, December 1, 2013
Christmas to me...
is a celebration of the birth of my savior. To me, this season is all about Him. Babies are always a miracle of life, but God came to us as a tiny newborn! Prophets told about his birth, life, and death hundreds of years before it happened, and that is a miracle worth celebrating over 2,000 years later.


I didn't expect to have any pages without pictures in this album, but when I got to thinking about WHY I want to make this album, I thought about all the things I want to do this year, and then I got to thinking about why Christmas is so important to me. Christ's birth is the center of my focus. I could have taken a picture of one of my nativity sets, but wound up with this phrase from my Silhouette files. I just pulled it up, put in a Silhouette pen, and let the machine do the artwork.
Journal Your Christmas 2013
There are so many different things going on during the month of December because there are so many many ways to celebrate the Christ Child's birth. I want to capture the month of celebrating the fulfillment of God's promise. Yes, it's a month full of activities and love and the stress of trying to juggle it all. I've decided to throw the balls in the air and enjoy seeing them spin. There are many things on my calendar, and many things I want to make and bake.This year I will make no-bake Christmas cake, fruit balls, and divinity. I will go to Dollywood and see all the Christmas shows and lights. I will go to movies and concerts, I will watch the endless parade of movies on the Hallmark channel, and I will enjoy it all! But for just 15 minutes every day I want to be sure to stop and document the season. It's only a month, and I can do it all for one month. But I have prepared. I signed up for Shimelle Lane's Journal Your Christmas, and I also signed up for Simple Scrapper's Holiday Storyteller. Each day I'll just pick whichever prompt I want to add. I made a mini album so I only have to spend 15 min a day on this project.
 It's a simple album using 8 1/2 x 11 card stock cut in half, a piece of chipboard, Bo Bunny's new Siver and Gold collection, my Bind-it all, and various ribbons and fibers in my stash.
The phrase is from the Silhouette store, and I love how easy it is to create a mat for anything I cut out on the Silhouette!

The phrase is from the Silhouette store, and I love how easy it is to create a mat for anything I cut out on the Silhouette!
Thursday, November 14, 2013
Joyful Christmas Day 6
Tonight I went to my monthly Stampin' Up meeting, and this is one of the cards we made:

Wednesday, November 13, 2013
Joyful Christmas Day 5
Today I needed a quick quick card, and what better card to case to day than an extremely simple one on Pinterest (once again, no link to anyone's blog, just the image, so I don't know who to give credit to). But this took me 3 1/2 minutes, including getting everything out and taking the picture of the finished product. Simple, but totally worth sending out.

I can't wait to get my camera back, all I've had to take pictures with is my phone. When I see my sister at Thanksgiving, I'll get my camera that I left in her car last month back.
Tuesday, November 12, 2013
Joyful Christmas Day 4
Well, this morning I had computer issues at work, so instead of waiting until after work to make today's card, I decided to go ahead and clock a lunch break and make my card before the majority of my work day. Today's inspiration card (via Pinterest) can be found here. Nothing says "Christmas Craft" like loads of red and green glitter. :) I found Embossing Tinsel at Hobby Lobby several years ago, and it's perfect for this card! I used gold stickles for the stamens and the dots on the sentiment.

Note to self: Sentiment is 1 1/2 x 2 1/2, mat is 1 3/4 x 2 3/4.
Glitter paper is from K&Company independence glitter set.
And of course, I used Velum for the poinsettia again.
Monday, November 11, 2013
Joyful Christmas Day 3
Someone made a card with what looks like Tim Holtz' Tattered Poinsettia. I don't know who it was because I saw it on Pinterest, and the person who pinned it didn't link it to a blog or a gallery, just the image itself. Such a bummer because when I find something that inspires me as much as this one did, I'd like to see more of the artists' work.

This was a very easy card to make. I took a 12x12 piece of textured white cardstock and trimmed a piece 5 1/2 x 11, and folded it in half. Then I cut another piece 5 1/4 x 5 1/4. Then I used my coluzzle and cut a circle in the middle that was just a little bit bigger than the poinsetta itself for the frame. I embossed "Merry Christmas" from the Petite Pairs set in one corner, and three blings in the opposite corner, and then pop dotted it onto the card.
I stamped the poinsettia on some velum which I bought years ago. Isn't it great that paper doesn't have an expiration date? lol. This was a very fast card!
Sunday, November 10, 2013
Joyful Christmas Day 2
Oh, there are so many different ideas for this stamp set on Pinterest, I may be making cards with this set until Christmas (unless I decide to do another set). I figured out something today. Yesterday I stamped and embossed 3 times in order to have three layers. Today I figured out if I use my Fiskars fingertip knife when cutting out the middle, I can use what's left of that stamp/embossing for the bottom layer


I decided for my sentiment, I wanted a different shape than what I had easily available... I wanted one that was just big enough for my sentiment, "Merry Christmas" from the Petite Pairs set. I took out my spellbinders, and realized that if I ran the scalloped square shape through the big shot twice, it could become a rectangle. The key to this working was the magnetic platform for the big kick. Yes, I know you could also use washi tape and tape the spellbinder to the embossed sentiment, but I'm a little lazy, and the magnetic platform really makes a difference. And of course, I had to add some bling to the middle. Here's today's finished card:

The card that inspired my creation (and I think is better) is here.
Saturday, November 9, 2013
Joyful Christmas Day 1


The inspiration I used to create my cards can be found here.
Sunday, November 3, 2013
Productive Crop
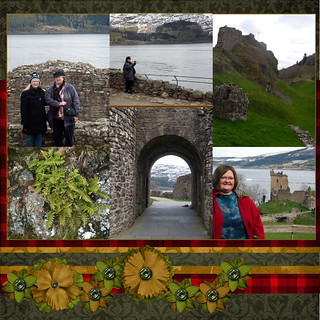
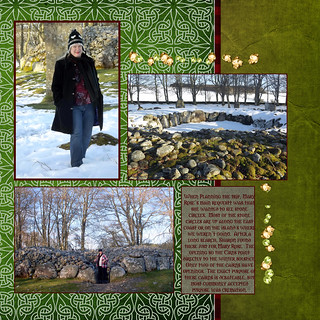
I had a very productive day at the Choo-Choo scrappers' crop yesterday. I completed almost 10 layouts on my sisters' Scotland scrapbook. They really want it for Christmas, and I'd like to finish it too :)
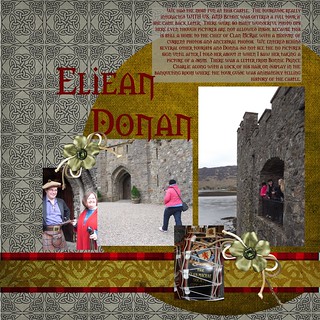
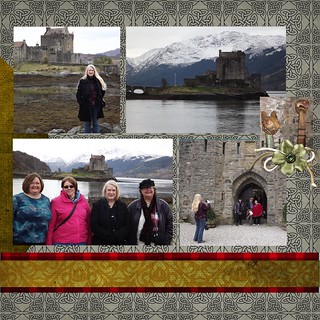
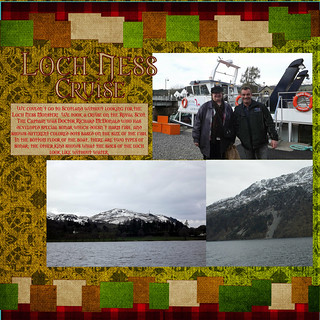
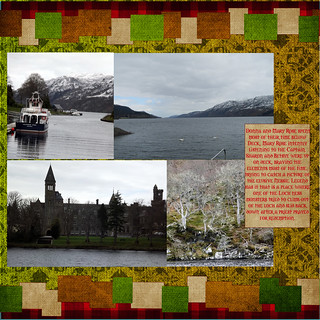
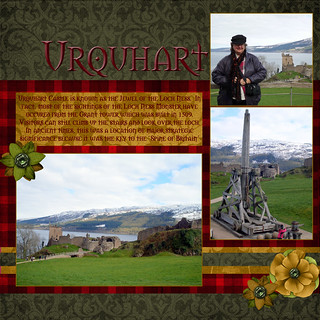
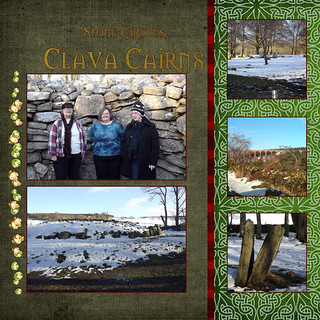
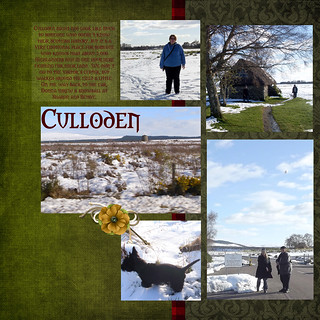 I learned a couple of techniques accidentally yesterday...beveling the text to make it appear 3-dimensional (Urquhart), and how easy it is to create an outline for text or photos (Clava Cairns).
I learned a couple of techniques accidentally yesterday...beveling the text to make it appear 3-dimensional (Urquhart), and how easy it is to create an outline for text or photos (Clava Cairns).
Saturday, October 26, 2013
Happy Halloween
I got this stamp a few weeks ago, but this is the first time I have used it. It took a few tries to get a clean stamp because the stamp is large, and the middle didn't want to transfer. I finally decided to do it differently. I cut the paper and instead of stamping onto the paper, i put the stamp inked upside up, and placed the paper on top of it and rubbed the image onto it.
I used distress inks to color. The first one I used reinkers and a water brush, and it took quite a bit of time, but I like the results. I used the Tim Holtz ruler to pierce an edging on it, then used pop dots to give it a little bit of dimension

The second card I used the Distress markers. I liked the control it gave me for coloring, but I guess I need to work with them more because I like the colors I got with the reinkers better. Instead of piercing around the edge of this card, I used the deckle blade on my cutterpede to trim it to where there isn't any white showing, and I think I like that look better.

Next time I use this stamp, I think I'll use a combination of reinkers and markers.
Saturday, July 27, 2013
Piano Card
Don't you just love it when you wake up on your day off and your mojo is screaming to be used?
The pianist at church had a birthday this week, and last weekend I saw this card on Pinterest, and knew it was just the card for Martha! I wound up using the same paper collection which I had used for a mini album that I made for her wedding in 2011. I really loved the original, but here's my take on it, and am so pleased that I already intend to make a couple more:

I had a few challenges, but figured out the best way to do the keyboard was to create a file on my Silhouette.
I had intended to make some roses using my McGill punches, but wound up using a cluster from Prima.
I don't have a butterfly punch that I wanted, so I had to improvise. I was about to cut one out with the Silhouette, but decided instead to look for a stamp. (Insert groan here thinking about dragging all my stamps out to look for just the right one). But then I remembered that I'd decided to take a picture of all my stamps and put them in a folder on dropbox, so I picked up my kindle, took a quick look, and had just the stamp I wanted in less than a minute! For those of you that don't know what dropbox is, it's a cloud storage for files and photos. If you are interested and sign up using this link, we both get free storage: http://db.tt/Ja2OshBS I found out about it when I lost some digi pages due to a computer issue. If you want to take a peek at my stamp album, https://www.dropbox.com/sc/58nmcf3jym4xh54/k_ oVKjsX4w and let me know if you are able to look at my other pictures from that link. Test the security of it if you will.
Saturday, February 2, 2013
LOAD213 DAY2
So today's prompt was to figure out what would consist of a perfect day for me and scrap it, with the intention of from knowing what a perfect day would be then it could be created. God has blessed me with many perfect days in my life. My trip to Scotland was a whole week of perfect days. This was a small snippet of one of those days. But another page completed in my sister's digital scrapbooks. :) The paper and overlays are from a kit on digitalscrapdesigns.com I created the loopy design above and below the panoramic picture after spending too much time trying to find one.


Friday, February 1, 2013
LOAD213 Day 1
I don't know how Lain could challenge me more than she did today. She actually challenged us to create a layout without words! Words are the difference between a photo album and a scrapbook in my opinion. But I do have these pictures that I haven't been able to come up with a clever title for, nor have I decided what story goes with the pictures. But I did know of a technique I wanted to use! And the pictures were too cute to leave unscrapped.


First, I cut 2 circles out with my coluzzle, the larger one a light green, the other a reddish pink.

Then I used the Tim Holtz Distressing tool and distressed the edges.

Then I inked the edges of the green pp with Pine Needles Distress ink. The distressing I did in the previous step helps the saturation degree of the edges.

Then I used some adhesive sheets by 3L to adhere adhesive to all of the pinkish red circle and adhered to the middle of the green circle.

Using the scissors, I cut the circle in to half, and then quarters, and the eighths.

Then using Festive Berries, I inked the edges of the pieces. See the difference it makes on these?

Then I used Enamel Accents and put fake seeds on the watermelon pieces.

Then using a cd to put the watermelon pieces on a pleasing semi-circle, I attached the pieces to my layout.

Here is the final result. I used Sketch Savvy #76 for the design. I cut the shape at the bottom out with the Silhouette, and then distressed and inked it the same as I did the green circle in the 3rd step above. And then for another detail, a technique I did which I wasn't planning to do was the stitching. I actually used my Sew Easy! I was almost finished stitching when I realized that the green piece of paper was one of the pieces that Lain sent me for winning LOAD212. If I had thought, I couldn't have planned it better.

Friday, January 25, 2013
ScrapHappier213
What makes you happy about scrapbooking? I think for me, it is seeing finished pages that have the pictures and the stories. For me, that is what makes my scrapbooks special, to have the stories with the pictures. My family has a history of strokes and memory loss, and when I am old and can't remember, I'll still have my memories. But don't think that's all, I adore using different techniques on the pages. I love using tools and creating my own embellishments. Nothing better than making a title or an embellishment and knowing it's better than what I could have bought in the store.
This time last year, I was preparing to do something that I heard Lain Ehmann talking about on paperclipping round tables (the most amazing scrapbooking podcast). It seemed revolutionary, or perhaps I should say it was evolutionary. The task: to create one scrapbook layout each and every day, no matter what. The premise is that by doing this task, you find out what your style is, what supplies you really do like, and improve your personal process of creating a page.
I succeeded. I created a page each and every day in February 2012. I created pages with pictures I had wanted to scrap every time I came across them in my box of photos, pictures I hadn't thought about scrapping, and even ones that I had almost forgotten I had. It was an incredible experience and one that I would encourage everyone who loves to scrap to embrace at least once! The video prompts are general enough that it can be interpreted many different ways!
I had a routine in place. When I woke up, I would watch the video prompt. Sometimes I knew right away what I was going to scrap, and other days I didn't have a clue, and figured I'd just scrap whatever inspired me for the day. Then I would go to work at my real world job and let the prompt stew around in my mind. I usually wound up writing my journaling on a break, and my title would usually come to me as a result of the journaling. I discovered that for me, I like having the journaling done first. Having the journaling done helped me know where I was going with the page, which helped in choosing the paper from all my options, which embellishments would compliment the story, and made me realize what I wanted to stand out from the pictures, even helping in narrowing down the photo selection in some cases...and send me looking for another picture that I knew I had somewhere.
These are a few of my favorite layouts from last February:
I had seen a layout which inspired me to want to create a graphic background with hexagons. I didn't have anything to punch out hexagons, but I did have a set of spellbinder octagons. It took me too long to cut these out, and placing them was a pill, but I did this on one of those days that I had more time to play:

I don't have a cricut, but a couple of years ago when I was shopping with my friend who does have one, we came across a smoking hot deal on some cricut cartridges, and I bought a couple of pooh cartridges for her knowing that one day I'd be using them. I went to her house one day last Feb, and knew it was my chance to use it. I had so much fun making this page of my daughter's last birthday with her papa.

I almost forgot about these pictures of me and my best friend in elementary school. As you can see, some of them have been damaged over the years. This page didn't take me very long at all because the owls were print and cut, the design was simple, and

This was a great time to finally put some of those scrapbook ideas that I'd save to lift to use. I had so much fun with this one.

Sometimes a sketch is just screaming to be done, and I had so much fun with this one.

One day the prompt was to simply scrap some photos that make you happy.
 Very importantly, I also took time to document some of my family history

I hope you think of joining me for the February 2013 layout a day challenge.
On to the next stop!
This time last year, I was preparing to do something that I heard Lain Ehmann talking about on paperclipping round tables (the most amazing scrapbooking podcast). It seemed revolutionary, or perhaps I should say it was evolutionary. The task: to create one scrapbook layout each and every day, no matter what. The premise is that by doing this task, you find out what your style is, what supplies you really do like, and improve your personal process of creating a page.
I succeeded. I created a page each and every day in February 2012. I created pages with pictures I had wanted to scrap every time I came across them in my box of photos, pictures I hadn't thought about scrapping, and even ones that I had almost forgotten I had. It was an incredible experience and one that I would encourage everyone who loves to scrap to embrace at least once! The video prompts are general enough that it can be interpreted many different ways!
I had a routine in place. When I woke up, I would watch the video prompt. Sometimes I knew right away what I was going to scrap, and other days I didn't have a clue, and figured I'd just scrap whatever inspired me for the day. Then I would go to work at my real world job and let the prompt stew around in my mind. I usually wound up writing my journaling on a break, and my title would usually come to me as a result of the journaling. I discovered that for me, I like having the journaling done first. Having the journaling done helped me know where I was going with the page, which helped in choosing the paper from all my options, which embellishments would compliment the story, and made me realize what I wanted to stand out from the pictures, even helping in narrowing down the photo selection in some cases...and send me looking for another picture that I knew I had somewhere.
These are a few of my favorite layouts from last February:
I had seen a layout which inspired me to want to create a graphic background with hexagons. I didn't have anything to punch out hexagons, but I did have a set of spellbinder octagons. It took me too long to cut these out, and placing them was a pill, but I did this on one of those days that I had more time to play:

I don't have a cricut, but a couple of years ago when I was shopping with my friend who does have one, we came across a smoking hot deal on some cricut cartridges, and I bought a couple of pooh cartridges for her knowing that one day I'd be using them. I went to her house one day last Feb, and knew it was my chance to use it. I had so much fun making this page of my daughter's last birthday with her papa.

I almost forgot about these pictures of me and my best friend in elementary school. As you can see, some of them have been damaged over the years. This page didn't take me very long at all because the owls were print and cut, the design was simple, and

This was a great time to finally put some of those scrapbook ideas that I'd save to lift to use. I had so much fun with this one.

Sometimes a sketch is just screaming to be done, and I had so much fun with this one.

One day the prompt was to simply scrap some photos that make you happy.


I hope you think of joining me for the February 2013 layout a day challenge.
On to the next stop!
Heather Dubarry: http://
Alison Day: http://adayinthelifeor5.
Danielle Taylor: http://
Alison Charlton: http://
Christy Strickler: http://
Lynnette Nagle: http://
Julie Shepler: www.sheplerfamily.com
Joy McHargue: http://www.
Kelli Panique: http://
Cathy Holiday: pikespeakscrapper.
Leslie Smith: http://lcsmithsaved-
Lori Martin: http://Www.
Connie Hanks: http://
Betsye Erazo: betsyerose.blogspot.com
Marcia Fortunato: mfortunato.
Regina Huminski: http://ginabeth1.
Beth Soler: http://www.
Kristie Sloan: http://kristiesloan.
Danielle Hunter: http://ecoscrapbook.
Katrina Forman: http://
Jessica Baldwin: www.inkyaddict.com
Cheryl McCain: http://
Briel Schmitz: http://
Marygail Mello: www.marygailscorner.
Monday, January 14, 2013
RMS Friends
The first 2 pages of 2013!

The Pretty Paper Party Prompt for today revolved around using strips of paper. Shimelle gave us a few sketches, but I like to use more than one photo on a page, so I changed it up a little. I used a sketch in Sketchbook Generations 8 book. It used several of the same features as one of Shimelle's sketches, and I'm happy with it.
The papers are from Bo Bunny's "Popsicle" collection. I must confess...this was the 4th collection I tried with these photos. I might have a few too many choices. But even with not being able to decide which set of pictures to scrap today (I found pictures from 2 different events that would fit the sketch and was equally happy with scrapping either one) and having to call a friend and say, "DD's middle school graduation, or Grandfather Mountain Highland Games?" and then struggling over which paper collection to use, this only took me 3 hours, which is very good for me. I'm a slow scrapper.
The white strips of cardstock will have the names of her friends put on them, but I didn't want to add them before putting on the internet.
Pretty Paper
Top o' the morning!
For the next 4 weeks, I am participating in a class by Shimelle, Pretty Paper Party.
I'm very excited about it this morning. I read the welcoming prompt and am sharing with you a picture of my pretty paper. I'm sure I could have gotten it into one picture, but it's in separate parts of the room...
This is my collection of Basic Grey collections:

Here I have my BoBunny (the last section and a half), Fancy Pants, Echo Park, and Carta Bella (my new favorite)

I love to make cards, and the prettiest cards are made with pretty paper, right? and the prettiest paper for cards are made in little 6x6 pads, wouldn't you agree?
 But this is the majority of my paper. These shelves hold most everything else (except what is in project boxes...you know, the iris boxes that I have set aside with everything related to heritage, scouts, Scotland, etc.)

I can usually talk myself out of buying a new collection when I think of these pictures...but sometimes the collection is just so wonderful that I know I'll be searching high or low for it once it goes out of print, and then paying too much for it once I find it. I did that with Cosmo Cricket's Snorkel collection. I put off buying it for myself until I couldn't find it anywhere...until I was at a Scrapbook Superstore, and then... there it was, (happy sigh), in a double collection pack. The other collection was eh, but I had to have it! I had finally found the collection I wanted! I have made 4 pages with it so far, and will use it again when I get the right pictures printed. Hmmm... maybe it's time to go find those pictures.

For the next 4 weeks, I am participating in a class by Shimelle, Pretty Paper Party.
I'm very excited about it this morning. I read the welcoming prompt and am sharing with you a picture of my pretty paper. I'm sure I could have gotten it into one picture, but it's in separate parts of the room...
This is my collection of Basic Grey collections:

Here I have my BoBunny (the last section and a half), Fancy Pants, Echo Park, and Carta Bella (my new favorite)

I love to make cards, and the prettiest cards are made with pretty paper, right? and the prettiest paper for cards are made in little 6x6 pads, wouldn't you agree?


I can usually talk myself out of buying a new collection when I think of these pictures...but sometimes the collection is just so wonderful that I know I'll be searching high or low for it once it goes out of print, and then paying too much for it once I find it. I did that with Cosmo Cricket's Snorkel collection. I put off buying it for myself until I couldn't find it anywhere...until I was at a Scrapbook Superstore, and then... there it was, (happy sigh), in a double collection pack. The other collection was eh, but I had to have it! I had finally found the collection I wanted! I have made 4 pages with it so far, and will use it again when I get the right pictures printed. Hmmm... maybe it's time to go find those pictures.
Subscribe to:
Posts (Atom)